
Bow Tie Analysis: A Worked Example and Barrier Rules
Bow tie analysis is a risk assessment technique that maps one hazard on a single diagram: the threats that could cause a loss of control (the top event) on the left, the consequences on the right, and the barriers that stop each threat or limit each consequence in between. Its purpose is to show whether every path to harm has real, working controls.
The diagram looks simple, which is also its weakness. Many bow ties list twenty "barriers" for one hazard, and half of them are training, procedures and signatures on a permit. On paper the risk looks buried under layers of protection. In the field, one missing guardrail is all it takes.
This guide shows you how to build a bow tie that holds up. You will get the standard terminology, a seven-step method, a complete worked bow tie for a fall from a flat roof, the barrier validity test that separates real barriers from management system activities, and a way to track barrier condition after the workshop is over.
One Roof, Two Very Different Risk Reviews
Picture a logistics company that needs its warehouse roof drains cleared every autumn (a fictional example). Two safety teams review the same job.
The first team writes a list of controls: "trained workers, permit to work, toolbox talk, supervisor present, harness, guardrails, weather check." Seven controls. The risk is rated as low and the job goes ahead.
The second team draws a bow tie. They find that the only thing standing between a worker and the roof edge on the east side is the guardrail, and a section of it was removed last month to lift a new air-handling unit onto the roof. Nobody put it back. The harness is listed, but there is no rated anchor point near the drains. The permit is signed every year, but no one checks the guardrail before signing.
Same job, same controls on paper. The difference is that the bow tie asks, for each path to a fall, "what physically stops it here, and does it work today?" That question is the whole method.
What Is Bow Tie Analysis?
Bow tie analysis is a barrier-based method for analyzing and communicating how one hazard is controlled. It combines the logic of a fault tree (causes leading to an event) and an event tree (outcomes following an event) into one picture centered on the moment control is lost. The international risk assessment standard IEC 31010:2019 lists bow tie analysis in Annex B.4, "Techniques for analysing controls" (IEC), next to LOPA and HACCP.
The method is generally traced to ICI course notes from a hazard analysis lecture at the University of Queensland in 1979, and Shell was among the first large companies to use it across its operations, from the early 1990s. In 2018, the Center for Chemical Process Safety (CCPS) and the Energy Institute published Bow Ties in Risk Management, a concept book written to bring consistent terminology and rules to a method that, in the authors' words, was "often conducted too loosely" (IChemE Hazards 28 paper, 2018).
| Element | What it means | Roof example |
|---|---|---|
| Hazard | Something with the potential to cause harm | Working at height on a flat roof |
| Top event | The moment control over the hazard is lost, before any harm | Worker falls from the roof level |
| Threat | A direct cause that can lead to the top event | Worker approaches an unprotected edge |
| Consequence | The harm that can follow the top event | Worker hits the ground |
| Prevention barrier | Stops a threat from reaching the top event (left side) | Edge guardrail |
| Mitigation barrier | Stops or limits a consequence after the top event (right side) | Personal fall arrest system |
| Degradation factor | A condition that makes a barrier fail or weaken (older term: escalation factor) | Guardrail section removed for a crane lift |
| Degradation control | Keeps a barrier working despite the degradation factor | Permit condition: reinstate and check guardrail before sign-off |
The UK Civil Aviation Authority, which publishes free bowtie templates for aviation hazards, defines the top event as "the point in time which describes the release or loss of control over a Hazard" (UK CAA). Some sources call mitigation barriers "recovery controls." The meaning is the same.
How to Build a Bow Tie in 7 Steps
A bow tie is built in a workshop with the people who do the work, the people who maintain the equipment and someone who knows the method. Start with a hazard the group knows well.
- Pick one hazard and define the scope. Choose a hazard where the consequences are serious and the controls matter: work at height, confined space entry, a flammable storage tank, forklift traffic. Write down the location, task and boundaries. One bow tie covers one hazard.
- Define the top event. Write the moment control is lost, not the harm. "Worker falls from roof level" is a top event. "Worker is killed" is a consequence. "No guardrail" is a threat or a failed barrier. If your top event already contains an injury, move it one step to the left.
- List the threats. Each threat must be able to cause the top event on its own. Aim for three to six. Vague threats ("human error," "unsafe act") give you nothing to put a barrier against. Name the physical situation instead.
- List the consequences. Describe what can happen after the top event. Different consequences need different barriers, so separate them: impact with the ground, a worker left hanging in a harness, a swing into the structure.
- Add prevention barriers to each threat line. Put them in the order the threat would meet them. Test every candidate with the validity test further down. Most threat lines end up with one to five real barriers.
- Add mitigation barriers to each consequence line. Same test. These barriers act after the top event, so they must work in the seconds or minutes that follow.
- Add degradation factors and controls for the critical barriers. Ask what makes each barrier fail in practice, then which activity keeps it working. This is where training, inspection, maintenance and the permit to work belong.
Once the diagram is agreed, assign an owner to each barrier and record its current condition. A bow tie without owners is a poster.
Worked Example: A Bow Tie for a Fall From a Flat Roof
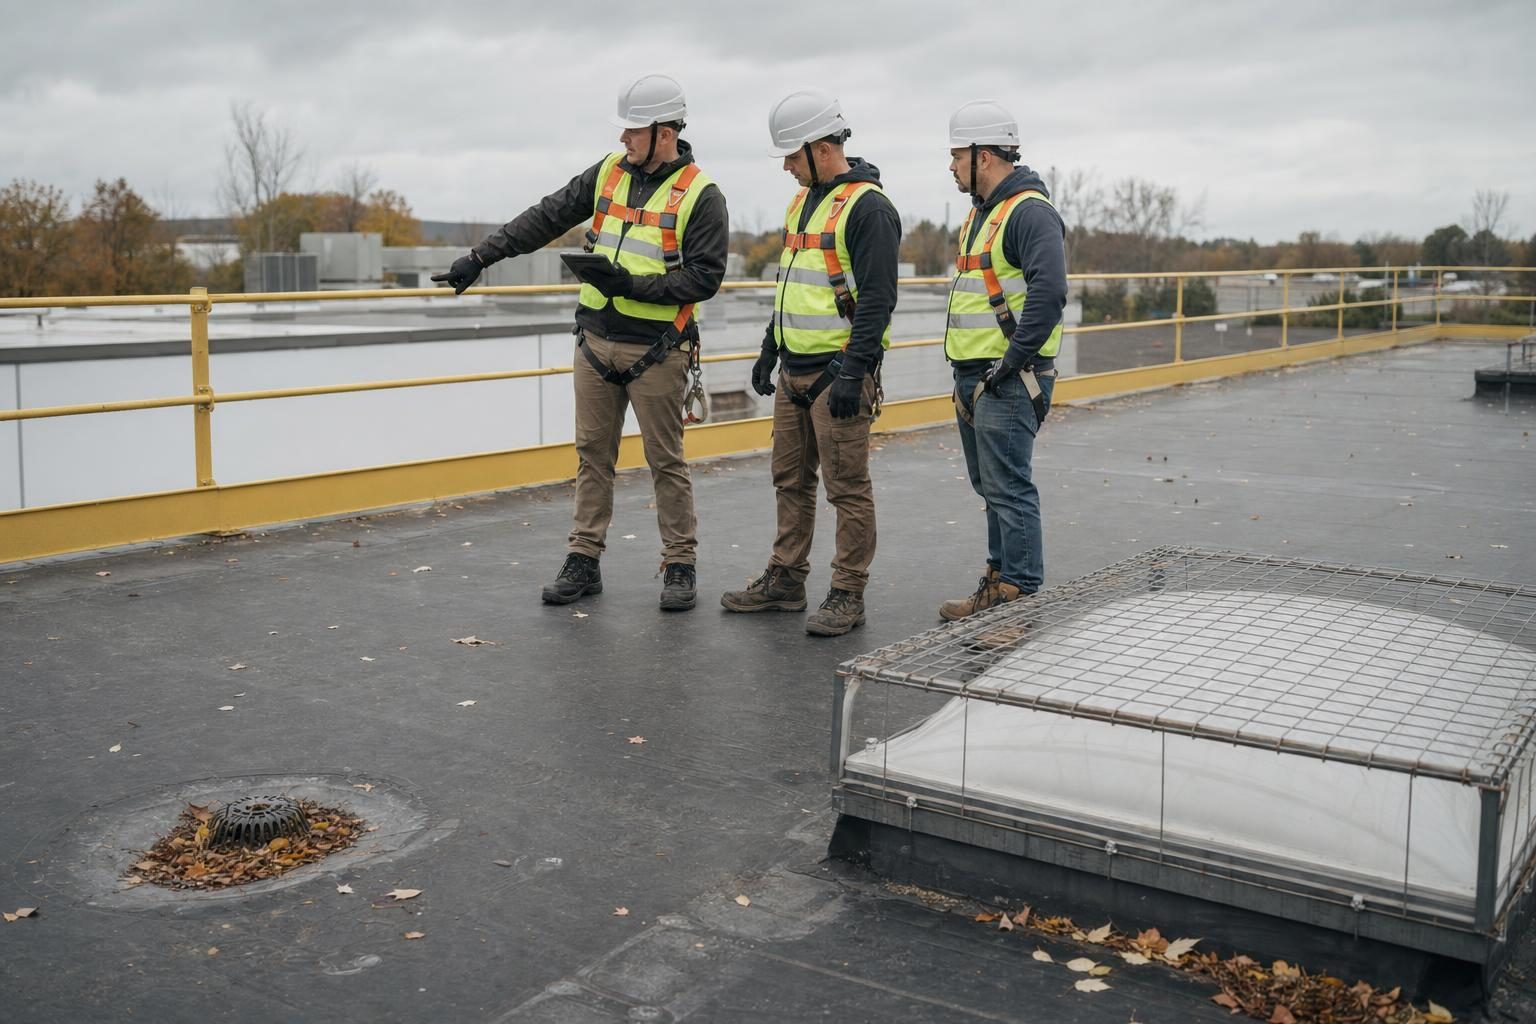
This worked example uses the roof-drain job from the scenario. The roof is flat, about 5 m (16 ft) above ground, with no parapet on two sides, three plastic roof lights, and access by a portable ladder. Work at height is a good bow tie subject: falls, slips and trips caused 844 of the 5,070 US workplace deaths in 2024 (BLS CFOI 2024), and fall protection in construction (29 CFR 1926.501) was again OSHA's most cited standard in fiscal year 2025 (OSHA).
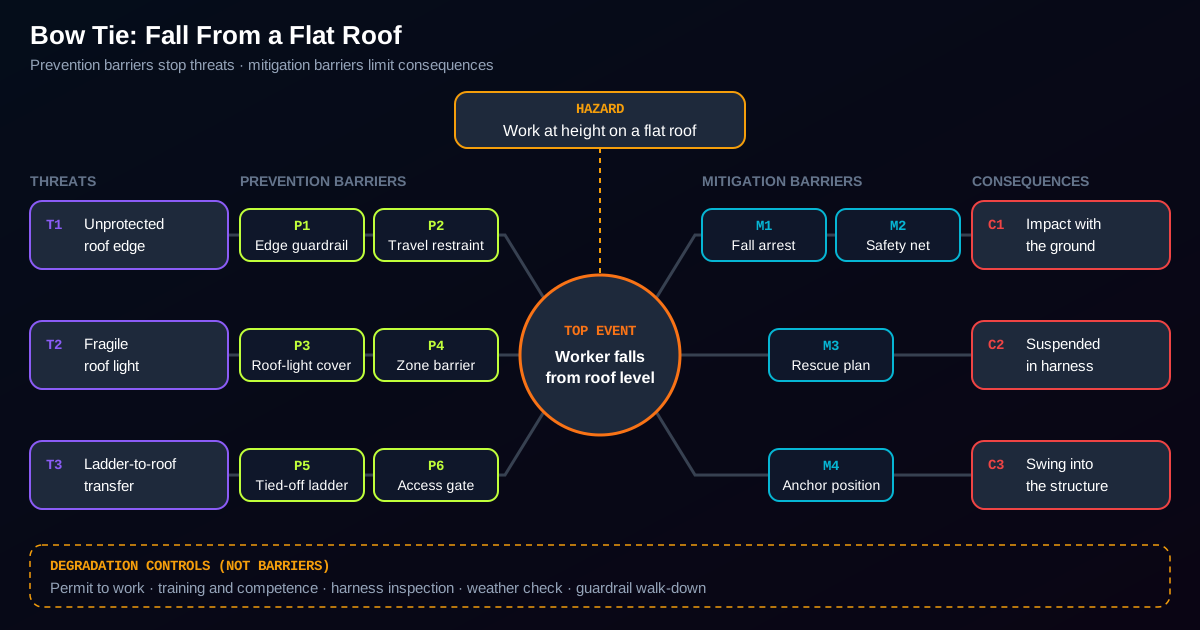
Hazard: working at height on a flat roof. Top event: worker falls from roof level.
Left side: threats and prevention barriers
| Threat | Prevention barrier | Type | Why it qualifies |
|---|---|---|---|
| T1. Worker approaches an unprotected roof edge | P1. Edge guardrail with top rail, mid rail and toe board | Passive | Physically stops a person going over; can be inspected |
| P2. Travel restraint: harness on a fixed-length lanyard to a rated anchor, set so the worker cannot reach the edge | Passive (once rigged) | Physically prevents reaching the edge; independent of the guardrail | |
| T2. Worker steps onto or through a fragile roof light | P3. Fixed mesh cover or rated screen over each roof light | Passive | Stops a fall through the light; visible and checkable |
| P4. Physical barrier around the roof-light zone, keeping foot traffic out | Passive | Keeps people away from the fragile area; independent of the cover | |
| T3. Loss of balance at the ladder-to-roof transfer | P5. Ladder tied off at the top and extending at least 3 ft (0.9 m) above the landing | Passive | Gives a handhold and stops the ladder moving; OSHA 29 CFR 1926.1053(b)(1) sets the 3 ft extension |
| P6. Access gate or guardrail opening at the transfer point | Passive | Keeps the transfer away from an open edge |
For guardrails, OSHA 29 CFR 1926.502(b) sets a top rail height of 42 inches plus or minus 3 inches and a strength of at least 200 pounds applied near the top edge (OSHA 1926.502). OSHA requires fall protection in construction where an unprotected edge is 6 feet (1.8 m) or more above a lower level (OSHA 1926.501(b)(1)). Check the rules that apply where you work. Other countries set different thresholds, and some set none.
Right side: consequences and mitigation barriers
| Consequence | Mitigation barrier | Detect, decide, act |
|---|---|---|
| C1. Worker hits the ground or a lower level | M1. Personal fall arrest system: full-body harness, energy-absorbing lanyard, anchor rated for the load | Passive once rigged; the geometry must be right before work starts |
| M2. Safety net under the roof-light zone (where installed) | Passive | |
| C2. Worker is left suspended in the harness | M3. Rescue plan with rescue kit on the roof and a trained rescuer present | Detect: the second worker sees the fall. Decide: rescuer starts the plan. Act: lowering or lifting device brings the worker down |
| C3. Worker swings into the building or a ladder (pendulum) | M4. Anchor placed directly above or behind the work position to limit swing | Passive; set during rigging |
The fall arrest system must meet OSHA 1926.502(d): an anchorage able to support at least 5,000 pounds per worker (or a system designed by a qualified person with a safety factor of two), a maximum arresting force of 1,800 pounds with a body harness, free fall of no more than 6 feet without contact with any lower level, and a deceleration distance of no more than 3.5 feet. On a 5 m roof, the clearance check is real work, not a formality.
The rescue barrier matters because being arrested is not the end of the event. OSHA's bulletin on suspension trauma warns that a worker left hanging in a harness can lose consciousness, and that the resulting orthostatic intolerance can be fatal; it recommends planning to prevent prolonged suspension and to rescue as quickly as possible (OSHA SHIB 03-24-2004). OSHA 1926.502(d)(20) makes prompt rescue an employer duty.
Notice what is not on the diagram as a barrier: training, the permit, the toolbox talk, the supervisor. They appear in the next two sections, where they belong.
What Counts as a Barrier? The Validity Test
A barrier is a control that, on its own, can stop a threat from reaching the top event or stop a consequence from developing. The CCPS/Energy Institute rule is that every barrier must be effective, independent and auditable (IChemE, 2018):
- Effective: it can completely stop the sequence on that line when it works as designed.
- Independent: it does not fail for the same reason as the threat or as another barrier on the same line.
- Auditable: you can check that it is in place and working.
For active barriers (ones that must sense something and respond), there is a second test: the barrier must include all three elements of detect, decide and act. A gas detector alone is not a barrier. A gas detector, an alarm logic and an automatic shutdown valve together can be. A rescue kit alone is not a barrier. A person who sees the fall, a rescuer who knows what to do and the device that brings the worker down together are.
Applying the rule usually leaves between one and five barriers per threat line. The IChemE paper describes a drilling contractor's well-control bow tie with 20 prevention and 32 mitigation "barriers" and warns that long lists like this give managers "a false sense of security."
Common "barriers" that fail the test
| Candidate | Why it is not a barrier | Where it goes |
|---|---|---|
| Working-at-height training | Cannot stop a fall on its own; it supports people who operate barriers | Degradation control (competence) on P2, M1, M3 |
| Permit to work | A management process that checks barriers are in place; it does not stop a fall | Degradation control on P1, P2, P4 and M3 |
| Toolbox talk before the job | Communication, not a physical or functional stop | Degradation control (awareness) |
| Supervisor present | Not independent and not continuously able to stop the threat | Part of detect-decide in M3, or a degradation control |
| "Be careful near the edge" sign | Cannot stop anyone | Remove or treat as a minor degradation control |
| Harness inspection program | Keeps the harness working; does not stop a fall itself | Degradation control on M1 |
| Weather check | Prevents a degradation (wind, ice) rather than the fall | Degradation control on P2 and M1 |
This is not a judgment that these activities are unimportant. Most of them are essential. The point is that they act through the barriers, so if you count them as barriers, you count the same protection twice.
Degradation Factors and the Permit to Work
A degradation factor is a condition that makes a barrier fail or work less well. Degradation controls are the activities that keep the barrier in its designed state. The CCPS/Energy Institute book notes that degradation controls "can, but do not necessarily" meet the effective, independent and auditable criteria, which is why they sit on a separate branch below the barrier.
For the roof bow tie, the critical barriers and their degradation paths look like this:
| Barrier | Degradation factor | Degradation control |
|---|---|---|
| P1. Edge guardrail | Section removed for a lift or delivery and not reinstated | Permit to work: guardrail walk-down before issue; reinstatement recorded when the lift permit closes |
| P2. Travel restraint | Lanyard too long for the anchor position | Pre-marked anchor points with set lanyard lengths; competence check |
| P3. Roof-light covers | Cover lifted for cleaning or corroded fixings | Planned inspection of covers; permit condition |
| M1. Fall arrest system | Damaged webbing or a harness that has already arrested a fall | Inspection before each use and removal from service after impact loading, per OSHA 1926.502(d)(19) and (d)(21) |
| M1. Fall arrest system | Not enough clearance below the anchor | Clearance calculation in the method statement |
| M3. Rescue | Rescue kit left in the van; no trained rescuer on the shift | Permit cannot be issued without a named rescuer and kit on the roof |
This is where the permit to work earns its place. On a bow tie, the permit is a degradation control that sits under several barriers at once. It is the moment someone confirms that P1, P2, P3 and M3 are in place before the work starts. The IChemE paper uses the same logic in its tank-overfill example, where a functioning permit to work is one of the management system controls that keeps the high-level trip from being defeated during maintenance.
That gives you a practical use for the bow tie: turn the list of critical barriers and their degradation controls into the checklist on the permit. If a barrier is on the bow tie, the permit should ask whether it is in place.
Tracking Barrier Condition After the Workshop
A bow tie shows how risk is controlled when every barrier works. The real value comes from checking whether they still do. The CCPS/Energy Institute guidance separates a barrier's inherent strength (how good it is as designed) from its condition (its state today), and proposes simple color coding over complicated scores:
| Condition | Meaning | Color |
|---|---|---|
| Effective | In place, available and effective | Green |
| Partially effective | In place and available, but working below its intended function | Yellow |
| Not effective | Not in place or not available | Red |
| No data | No current information | White |
Source: IChemE Hazards 28, Table 1 (an optional black code marks a deactivated barrier).
In our roof example, the scenario's bow tie review would show P1 red (guardrail section missing on the east side), M1 yellow (harnesses in date, but no rated anchor near the drains) and M3 white (nobody knows whether the rescue kit is complete). That is a clear picture: two of the most important barriers on the main threat line are not working, so the job should not start until they are fixed.
For regular reviews, the same paper suggests five questions:
- Have the threats or the context changed (new work, new equipment, different season)?
- What is the current condition of each barrier, and is any barrier unavailable or bypassed?
- Is it safe to continue, or should the work stop?
- Are immediate measures or temporary extra barriers needed to continue?
- How are the longer-term repairs prioritized to bring barriers back to their design intent?
You do not have to review every barrier in depth every time. The paper suggests rotating the in-depth review so that, for example, all barriers have been examined within 12 months of meetings. When an incident does happen, the bow tie also gives your root cause analysis a ready map: which barriers were in place, which failed and why.
Bow Tie vs Fault Tree, Event Tree, LOPA and Fine-Kinney
Bow tie analysis is a control-analysis technique, not a scoring method. It works best alongside a method that identifies hazards and one that rates risk.
| Method | Main question | Output | Use it when |
|---|---|---|---|
| Bow tie (IEC 31010 B.4.2) | Which barriers control this hazard, and do they work? | One diagram per hazard with barriers and owners | You need to explain and manage controls for a major hazard |
| Fault tree analysis (B.5.7) | Which combinations of failures cause this event? | Logic tree, often with probabilities | You need to quantify the likelihood of a top event |
| Event tree analysis (B.5.6) | What outcomes follow an initiating event, depending on which safeguards work? | Branching outcomes with frequencies | You need to quantify consequences after an event |
| LOPA (B.4.4) | Are there enough independent protection layers to meet a risk target? | Frequency calculation per scenario | Process hazards where a numerical target applies |
| HAZOP (B.2) | How can this process deviate from its design intent? | Worksheet of deviations, causes, safeguards | Systematic identification of process hazards |
| Fine-Kinney | How big is this risk, and how urgent is action? | Risk score (probability × exposure × severity) | Rating and prioritizing many workplace hazards |
A typical workflow in a workplace risk assessment: identify hazards with a walk-through, a JSA or HAZOP; score them with Fine-Kinney or a risk matrix; build bow ties for the few hazards with serious or fatal potential; and use the bow tie to decide whether the risk is as low as reasonably practicable, as described in our ALARP guide. When you choose barriers, the hierarchy of controls still applies: guardrails before harnesses, harnesses before warning signs.
Common Mistakes
1. The top event is actually a consequence
"Worker fatally injured" is not a top event. If the top event contains harm, there is no room on the right side for mitigation barriers such as fall arrest and rescue. Move it back to the moment control is lost.
2. Threats are too vague
"Human error" and "unsafe behavior" are not threats you can put a barrier against. Ask what the person was doing and where: walking to the edge, stepping on a roof light, stepping off a ladder.
3. Management activities are counted as barriers
Training, permits, audits and supervision make the diagram look well defended. They are degradation controls. Counting them as barriers doubles the apparent protection and hides single-barrier lines.
4. Incomplete active barriers
A barrier that detects but cannot act, or acts only if someone happens to notice, is not complete. Check detect, decide and act for every active barrier, especially rescue.
5. One bow tie for everything
A bow tie for "construction site" is unreadable. Build one per hazard. The IChemE paper advises piloting two or three bow ties first and warns that too many bow ties confuse staff.
6. The bow tie is filed and forgotten
A bow tie drawn once for an audit and never reviewed shows the risk as designed, not as it is. Record barrier condition and review it on a fixed rhythm.
How FindRisk Supports Bow Tie Work
A bow tie is only as good as the condition data behind it. The weak point in most organizations is the step between "the barrier is on the diagram" and "someone checked it this week." FindRisk is built for that step.
With the AI checklist generator, you can turn the barriers and degradation controls from your bow tie into a site inspection checklist: guardrail complete on all edges, roof-light covers fixed, anchors marked, rescue kit on the roof. During the walk-round, photo hazard marking lets you mark a missing guardrail section or a lifted cover directly on the photo, and the AI analysis flags other hazards in the frame. You can score what you find with the built-in Fine-Kinney assessment and produce a professional report in seconds, on iOS or Android.
The bow tie itself still belongs in your workshop. FindRisk helps you check, record and report the condition of the barriers it depends on.
Frequently Asked Questions
What is the difference between a bow tie and a fault tree?
A fault tree works backward from one top event to the combinations of failures that can cause it, often with probabilities attached. A bow tie also covers the consequences after the top event and focuses on barriers rather than failure logic. IEC 31010:2019 lists bow tie analysis as a technique for analyzing controls and fault tree analysis as a technique for understanding likelihood, so they answer different questions and are often used together.
What is a top event in a bow tie?
The top event is the moment control over the hazard is lost, before any harm occurs. For working at height it is "worker falls from roof level," not "worker is injured." A good top event sits in the middle: threats on the left can cause it, and consequences on the right can follow it. If your top event already describes harm, there is no space left for mitigation barriers.
Is training a barrier in a bow tie?
No. Under the CCPS/Energy Institute guidance, training and competence cannot stop a threat or a consequence on their own, so they are not barriers. They are degradation controls that keep barriers working, for example the competence of the person who rigs a fall arrest system or carries out a rescue. Showing training as a barrier makes the diagram look better protected than it is.
How many barriers should a bow tie have?
There is no fixed number, but applying the effective, independent and auditable rule typically leaves one to five barriers on each threat or consequence line. A line with a single barrier deserves attention, because one failure leads straight to the top event or the consequence. A line with ten or more barriers usually means management activities have been counted as barriers.
Does a bow tie give a risk score?
Not by itself. A bow tie shows how a hazard is controlled and whether the barriers work, but it does not calculate a risk level. Many teams score the hazard with a risk matrix or the Fine-Kinney method before and after the workshop, and use the bow tie to explain the controls behind the score. The CCPS/Energy Institute guidance discourages complex numerical barrier scoring in favor of simple condition colors.
Who should attend a bow tie workshop?
Include people who do the work, people who maintain the equipment and barriers, a supervisor who plans the job, a safety professional and a facilitator who knows the method. Frontline workers are the best source of realistic threats and degradation factors, such as the guardrail section that is always removed for deliveries. Keep the group small enough to discuss each line properly.
Is bow tie analysis required by law?
Workplace safety laws generally require a suitable risk assessment but do not require a specific method. Bow tie analysis is one of the recognized techniques in IEC 31010:2019, and it is widely used in process safety, aviation and energy. Check your national regulations and industry requirements, and use the bow tie where it helps you control a serious hazard.
Conclusion
Bow tie analysis is useful because it forces one honest question for every path to harm: what physically stops it here, and does it work today? Define the top event as the moment control is lost, name real threats, and apply the effective, independent and auditable test to every barrier. Training, permits and inspections still matter, but as degradation controls that keep barriers working.
Start with one or two hazards that could kill someone, such as work at height or confined space entry. Build the bow tie with the people who do the work, give each barrier an owner and a condition color, and turn the critical barriers into checks on your permit and inspection checklist.
To check those barriers in the field, download FindRisk to create inspection checklists with AI, mark hazards on photos and produce a report before you leave the roof.
Try FindRisk
Ready to modernize your safety workflow?
Conduct AI-powered risk assessments, generate reports instantly, and keep your team safe — anywhere, anytime.